Have you tried coloring your hair to change up your look? Hair coloring has been a popular trend for many years, with different shades and styles available. It’s become a way for people to express their individuality and creativity, adding flair to their looks. Whether you’re following fashion fads, pop culture, or your favorite celebrities, hair color modes can change as fast as you can imagine.
Some popular hair colors include blonde, brunette, red, and pastel hues. While it’s always best to go to a salon and have a professional do your hair, hair coloring has become more accessible and manageable at home. However, doing it yourself can be challenging, even risky, especially when dealing with bleach. This article has your back if you plan to do a DIY hair color session at home.
Coloring your hair with bleach is a chemical process that can damage your hair if done incorrectly. Fear not, because understanding the right way of hair bleaching will help minimize damage and achieve your desired results.
Evaluate your hair's condition, texture, and type before coloring your hair. Certain hair types and textures may not be able to handle bleach like others. If you have dry, brittle hair, it’s best to reconsider bleaching, as it may cause further damage.
It’s important to understand that bleach is a strong chemical that can cause dryness, brittleness, and breakage to the hair if misused. As a safety measure, conduct a patch test before bleaching your hair to check for any potential allergic reactions or sensitivities.
Your efforts shouldn’t end after successfully coloring your hair. Once you’ve bleached your hair, you should use aftercare products, such as deep conditioning treatments, hair masks, and natural oils. The extra TLC is necessary because the bleaching process can take a severe toll on your hair.
If you’ve passed the patch test and you think you can maintain taking care of bleached hair, hop on board and feel free to proceed with the hair coloring process. Bleaching your hair at home can be tricky, but it’s achievable. The key is following a few guidelines to ensure you do it safely and end up with bold, brilliant locks. Here are some steps to help you.
Many hair bleaching products are available in the market nowadays, and it can be confusing which ones to buy. Ensure that you use a hair bleach product appropriate for your hair type and desired level of lightening. If unsure, consult a professional stylist or a hair care expert. The right products will do minimal damage to your hair and give you the best results.
Clean your hair before slathering on any coloring products. It doesn’t necessarily have to be fresh out of a wash, but it shouldn’t have remnants of dry shampoo, styling agents, or other hair products. Your hair should also be dry, save for the natural oil it produces.
However, some experts suggest coating your hair with coconut oil for at least an hour before putting on the hair coloring products. The oil can protect your hair and keep it well-conditioned throughout the bleaching process.
Bleach can ruin fabric, so wear an old shirt and use old towels during your hair coloring process. You should also wear gloves to protect your hands. Clear your workspace to ensure you don’t damage carpets or anything else around you. It’s handy to have hair clips for sectioning and a timer or clock to keep track of time.
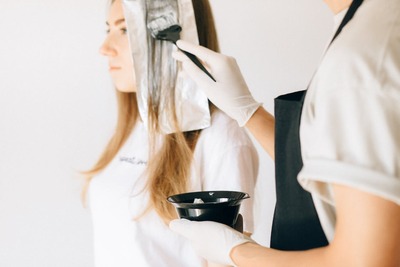
Mix the right amount of bleach with the developer and apply it to small sections of your hair. Doing so will ensure that the bleach is spread evenly throughout your hair and that you achieve your desired level of lightening. Hair products often come with instructions, so ensure you follow them to protect your hair.
Check your hair every five to 10 minutes to see the lightening process. Doing so will help you know when to rinse the bleach out of your hair, and it will also help avoid overprocessing and further damage.
Once you’ve achieved your desired level of blonde, rinse your hair thoroughly and follow up with a deep conditioning treatment. An excellent conditioning product can help nourish your hair after the tough bleaching process.
After washing and drying your hair, see how it turned out. Some people end up with an unflattering yellow hue or brassiness after bleaching. If this happens, use toner to even out your bleached hair. Toner products come with instructions, so you must follow them to color-correct your hair.
Once you’ve lightened those locks, it’s time to think of post-bleach hair care. Remember that bleach can be very drying, even if you have the healthiest hair condition. Below are some helpful tips to keep your hair in its best shape.
Deep conditioning treatments can help restore and keep your hair healthy, soft, and moisturized.
Use conditioning products regularly to achieve these results instead of only using them after your first post-bleaching wash. It would be best if you used a deep conditioner once a week.
Look for conditioning treatments that contain ingredients such as protein, keratin, or argan oil, which can help to strengthen and nourish your hair. You can also use a hair mask or leave-in treatment to provide additional moisture and nourishment.
Another tip is to avoid styling your hair with heat, such as blow-drying or flat ironing, for at least 48 hours after bleaching, as the heat can further damage your hair. Instead, let your hair air dry or use a diffuser attachment on your hair dryer if you must use heat. Besides heat styling, avoid sun exposure to protect your hair from UV rays and prevent additional drying.
Chlorine and saltwater are not your hair’s best friend. They can further dehydrate your hair, leading to breakage. While abandoning swimming for the rest of your life is impossible, you should skip swimming for at least 48 hours after bleaching your hair.
If you still plan to swim, wet your hair beforehand and apply a leave-in conditioner. Doing so will prevent your hair from absorbing too much chlorine or salt. You can also wear a hair cap to protect your hair and shield it from direct sunlight and UV rays.
Hair coloring is fun and exciting whether you do it yourself or have someone help you. More than that, it lets you express your style and get creative with your overall look. The hair bleaching process may sound challenging, even scary, to some. However, as you follow the guidelines above, bleaching your hair at home will be easier. Just remember to give your hair the extra TLC after bleaching.